react-native-firebase/messaging for push notification

반응형


yarn add @react-native-firebase/app @react-native-firebase/messaging @notifee/react-native


설치시 이슈 1.

The Swift pod `FirebaseCoreInternal` depends upon `GoogleUtilities`, which does not define modules.

To opt into those targets generating module maps (which is necessary to import them from Swift when building as static libraries), you may set `use_modular_headers!` globally in your Podfile, or specify `:modular_headers => true` for particular dependencies.

podfile에 use_native_modules! 아래에 다음을 추가. npx pod-install 다시 실행.
pod 'GoogleUtilities', :modular_headers => true
 
설치시 이슈 2.
FirebaseCoreInternal.h 에서
Module 'FirebaseCore' not found 와 같은 에러
 
pod update
pod repo update
pod 'FirebaseCore', :modular_headers => true 를 추가. npx pod-install (또는 ios 폴더에서 pod install) 다시 실행.
 
설치시 이슈 3.
FirebaseError: Firebase: No Firebase App '[DEFAULT]' has been created - call Firebase App.initializeApp() (app/no-app).
Invariant Violation: Module AppRegistry is not a registered callable module (calling runApplication). A frequent cause of the error is that the application entry file path is incorrect.
This can also happen when the JS bundle is corrupt or there is an early initialization error when loading React Native.
 
// AppDelegate.mm에 추가
#import <Firebase.h>


- (BOOL)application:(UIApplication *)application didFinishLaunchingWithOptions:(NSDictionary *)launchOptions
{
  self.moduleName = @"?????";
  // You can add your custom initial props in the dictionary below.
  // They will be passed down to the ViewController used by React Native.
  self.initialProps = @{};
  
  [FIRApp configure]; // << @react-native-firebase/messaging 을 사용하기 위해 추가함.

  return [super application:application didFinishLaunchingWithOptions:launchOptions];
}
 

설치시 이슈 4.

파이어베이스에서 다운받은 GoogleService-Info.plist 도 AppDelegate.mm 이 있는 동일한 폴더에 추가해주어야 한다.
 
Podfile
...

		rescue => e
      Pod:UI.warn e
    end
  end

  config = use_native_modules!
  
  pod 'GoogleUtilities', :modular_headers => true
  pod 'FirebaseCore', :modular_headers => true

  # Flags change depending on the env values.
  flags = get_default_flags()

  use_react_native!(
    :path => config[:reactNativePath],
    # Hermes is now enabled by default. Disable by setting this flag to false.
    :hermes_enabled => flags[:hermes_enabled],
    
...


remote notification (push notification) 권한 명칭으로 안드로이드는 POST_NOTIFICATIONS , 아이폰은 notification

사실 FCM (Firebase Cloud Messaging) 을 이용하는 것이다.

그냥 notification 은 local notification 을 의미한다. 사용자와 인터렉션 하는 UI 같은 것. notifee 를 통해 이를 세밀히 다룰 수 있다.


따라서 용어구분을 위해 remote / local 모두 통합하는 용어로 push notification 으로 사용할 것.


setBackgroundMessageHandler 가 ios 에서 정상 동작하려면,
https://rnfirebase.io/messaging/usage#background-application-state 에서 ios 측 HeadlessCheck 구현 및 서버에 다음도 추가해주어야 한다.
apns: {
            payload: {
              aps: {
                contentAvailable: true,
On iOS, when the app is in quit state, the setBackgroundMessageHandler is never invoked even when I receive the notification. How can I fix this?
https://github.com/invertase/react-native-firebase/blob/main/docs/faqs-and-tips.md

notifee 에서 다음은 ios 뱃지 관련 기능이다.
notifee.incrementBadgeCount(); // ios 는 확실히 1씩 증가했다.
notifee.setBadgeCount(0).then(() => console.log('Badge count removed')); // 이거는...

아직 다음 두개가 ios 에서 동작하지 않았다.
messaging().onNotificationOpenedApp()
messaging().getInitialNotification()
https://github.com/invertase/react-native-firebase/issues/6915 이러한 이슈가 있다.
@react-native-firebase/messaging 와 @notifee/react-native 를 함께 사용하면 저런 이벤트 리스너들이 동작을 제대로 안할 수 있다고 한다.
https://github.com/invertase/react-native-firebase/issues/5104 여기서 마지막 부분에 notifee 의 리스너들을 사용하라고 되어 있다.
한국 블로그에도 관련 이슈를 정리해놓았다.
https://velog.io/@bongbong2da/Fix-FCM-iOS-onNotificationOpenedApp-getInitialNotification-%ED%95%B8%EB%93%A4%EB%9F%AC%EA%B0%80-%EC%9E%91%EB%8F%99%ED%95%98%EC%A7%80-%EC%95%8A%EC%9D%84-%EB%95%8C
FCM 과 notifee 를 둘 다 설치했을 때 FCM 의 onNotificationOpenedApp, getInitialNotification 은 Notifee 의 onForegroundMessage 로 통합된다.
Notifee 삭제 후 빌드 시, 다시 FCM의 핸들러가 작동하게된다.
난 안드로이드 채널 생성 메소드를 사용해야 하므로 notifee 가 필요하다.
Foreground 라는 명칭 때문에 혼란이 있었다. (onForegroundMessage === onMessage라고 생각했기 때문)
FCM 의 각 핸들러는 다음과 같은 일을 한다.
onNotificationOpenedApp : AppState 가 background 인 상태에서 알림 클릭시 앱이 열리면 실행된다.
getInitialOpenedApp : AppState 가 terminated(exit)인 상태에서 알림 클릭시 앱이 열리면 실행된다.
Notifee 가 설치 되었다면 위 두 핸들러가 Notifee.onForegroundMessage 로 통합 되어,
분리해서 생각할 필요 없이 '알림을 엶으로써 앱이 Focus되었을 때' 라고만 생각 하고 할당 하면 된다.
Android 는 반대로 FCM 의 핸들러가 작동되고 Notifee 의 핸들러가 작동하지 않는다.
ios 에서 Notifee 에서도 리모트 노티 관련하여 지원하는 부분이 있는데 셋팅이 필요 하다. 이것도 셋팅 해야 한다.
https://notifee.app/react-native/docs/ios/remote-notification-support
>>> 이거 셋팅할 때
https://notifee.app/react-native/docs/ios/remote-notification-support#add-the-notification-service-extension
Cycle inside appname; building could produce unreliable results.
○ That command depends on command in Target 'yourprojectname': script phase “[CP-User] [RNFB] Core Configuration”
이런 오류가 날 수 있는데... TARGETS > yourprojectname > Build Phases 에서
[CP-User] [RNFB] Core Configuration 를 맨 아래로 드래그해주면 된다.
NotifeeNotificationService 이거 추가해주고 그게 Copy 설정을 [CP-User] [RNFB] Core Configuration 여기서 해주는데
NotifeeNotificationService 순서가 아래에 있다보니 오류난 것.

android 는 그냥 애초에 노티 떠있는 갯수가 앱아이콘 옆의 숫자가 시스템적으로 동기화 되어서 동작한다.
android 는 리스트의 노티를 클릭해서 들어가면 해당하는게 없어질 때 앱의 카운트도 감소하였다.


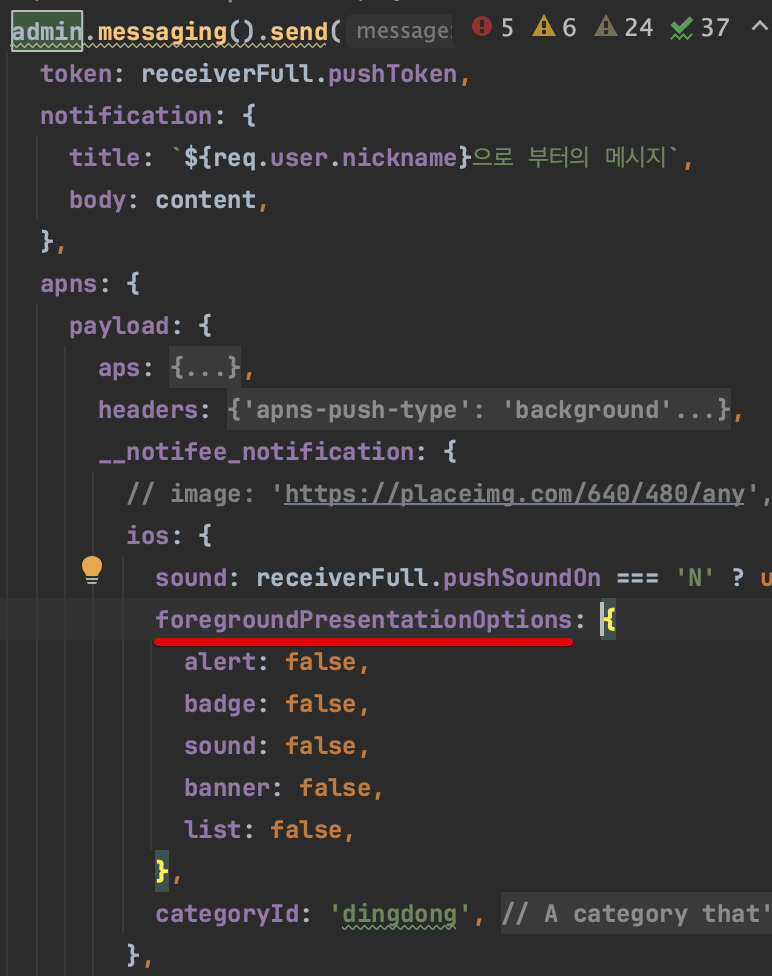
ios 는 foreground 인데도 노티가 보여졌다. foreground 에서 기본적으로 안보여지게 하려면 서버측에서 foregroundPresentationOptions 값들을 false 로 주어야 한다.
하지만 아래와 같이 메뉴얼의 notifee_options 가 아니라 __notifee_notification 명칭을 사용해야 했다.

https://github.com/invertase/notifee/blob/main/ios/NotifeeCore/NotifeeCore%2BUNUserNotificationCenter.m#L110
NSDictionary *foregroundPresentationOptions =
        notifeeNotification[@"ios"][@"foregroundPresentationOptions"];
NSDictionary *notifeeNotification =
      notification.request.content.userInfo[kNotifeeUserInfoNotification];
- (void)userNotificationCenter:(UNUserNotificationCenter *)center
       willPresentNotification:(UNNotification *)notification
         withCompletionHandler:
             (void (^)(UNNotificationPresentationOptions options))completionHandler {
https://developer.apple.com/documentation/usernotifications/unusernotificationcenterdelegate/1649518-usernotificationcenter?language=objc
response.notification.request.content.userInfo 는 리모트 푸시 데이터이다.

메뉴얼에는 분명히 notifee_options 라고 적어놓고는
https://notifee.app/react-native/docs/ios/remote-notification-support#1-update-the-message-payload-sent-via-your-backend
실제 코드에는 __notifee_notification 이라는 명칭을 사용해야한다.


Permissions


// ios Notifications 권한.
// Notifications 는 사용자가 granted 하지 않으면 보여질 수 없다. 한개의 앱의 전체적인 notification 권한은
// "not determined", "granted", "declined" 일 수 있다. 새로 설치했다면 "not determined" 상태이다.
// 권한을 request 하고 한번 decline 하게 되면 그 다음에 권한을 request 해도 사용자에게 권한을 묻지 않고 즉시 denied
// 를 리턴한다. 사용자는 iOS Settings UI 에서 notification permission 을 enable 시켜야 한다.
// If the user declines permission, they must manually allow notifications via the Settings UI for your application.
// If the user has accepted permission, notifications will be shown using the settings requested (e.g. with or without sound).
import messaging from '@react-native-firebase/messaging';

async function checkApplicationPermission() {
  const authorizationStatus = await messaging().requestPermission();

  if (authorizationStatus === messaging.AuthorizationStatus.AUTHORIZED) {
    console.log('User has notification permissions enabled.');
  } else if (authorizationStatus === messaging.AuthorizationStatus.PROVISIONAL) {
    console.log('User has provisional notification permissions.');
  } else {
    console.log('User has notification permissions disabled');
  }
}

// -1 = messaging.AuthorizationStatus.NOT_DETERMINED: Permission has not yet been requested for your application.
// 0 = messaging.AuthorizationStatus.DENIED: The user has denied notification permissions.
// 1 = messaging.AuthorizationStatus.AUTHORIZED: The user has accept the permission & it is enabled.
// 2 = messaging.AuthorizationStatus.PROVISIONAL: Provisional authorization has been granted.
// 3 = messaging.AuthorizationStatus.EPHEMERAL: The app is authorized to create notifications for a limited amount of time. Used for app clips.

// 다음과 같이 세부적으로 권한을 요청할 수도 있다. 이것도 마찬가지로 한번만 요청 인터렉션이 일어나고 다음부터는
// iOS Settings UI 에서 설정 가능하다.
 
await messaging().requestPermission({
  sound: false,
  announcement: true,
  // ... other permission settings
});
 
// alert true Sets whether notifications can be displayed to the user on the device.
// announcement false If enabled, Siri will read the notification content out when devices are connected to AirPods.
// badge true Sets whether a notification dot will appear next to the app icon on the device when there are unread notifications.
// carPlay true Sets whether notifications will appear when the device is connected to CarPlay.
// provisional false Sets whether provisional permissions are granted. See Provisional permission for more information.
// sound true Sets whether a sound will be played when a notification is displayed on the device.
// providesAppNotificationSettings false Indicates the system to display a button for in-app notification settings.

// messaging().requestPermission() 을 통해 권한을 읽어올 수 있지만,
// messaging().hasPermission() 를 통해 요청 인터렉션 없이 그냥 읽어올 수도 있다.

// iOS 12+ 부터는 provisional authorization 을 사용할 수 있다.
// 시스템이 사용자에게 다이알로그를 보여주지 않고 바로 notification permission 을 granted 해준다.
// 해당 permission 은 notifications 가 조용히 보여지도록 허용한다. 이 말은 즉,
// 오직 device notification center 에서만 보여진다는 의미이다. provisional notifications 를
// enable 시키고 싶다면 다음과 같이 하면된다. 그러면 사용자는 계속 display quietly, display prominently or not at all 할지 선택할 수 있다.
 
await messaging().requestPermission({
  provisional: true,
});

// iOS 12+ 부터는 Settings -> [App name] -> Notifications 로 리다이렉트 시키도록
// iOS Notification Settings 에서 버튼을 제공할 수 있다.
// 1. Request providesAppNotificationSettings permissions:
 
await messaging().requestPermission({ providesAppNotificationSettings: true });
 
// 1. Handle interaction when app is in background state:
 
// index.js
import { AppRegistry } from 'react-native'
import messaging from '@react-native-firebase/messaging'

...

messaging().setOpenSettingsForNotificationsHandler(async () => {
    // Set persistent value, using the MMKV package just as an example of how you might do it
    MMKV.setBool(openSettingsForNotifications, true)
})

...

AppRegistry.registerComponent(appName, () => App)
 
// App.tsx

const App = () => {
  const [openSettingsForNotifications] = useMMKVStorage('openSettingsForNotifications', MMKV, false)

  useEffect(() => {
    if (openSettingsForNotifications) {
      navigate('NotificationsSettingsScreen')
    }
  }, [openSettingsForNotifications])

  ...
}
 
// 1. Handle interaction when app is in quit state:
 
// App.tsx

const App = () => {
  useEffect(() => {
        messaging()
            .getDidOpenSettingsForNotification()
            .then(async didOpenSettingsForNotification => {
                if (didOpenSettingsForNotification) {
                    navigate('NotificationsSettingsScreen')
                }
            })
  }, [])

    ...
}


Cloud Messaging

 
// FCM messages 는 real Android/iOS devices 와 Android emulators 에 보내질 수 있다.
// iOS simulators 는 cloud messages 를 다루지 못한다. message 는 간단하게 data 의 payload 이다.
// 일반적으로 메시지를 다루는 유즈케이스는 다음과 같을 것이다.
// 1. notification 을 보여준다. (https://rnfirebase.io/messaging/notifications)
// 2. 기기에 조용히 message data 를 동기화한다. (AsyncStorage 같은 곳에)
// 3. 앱의 UI 를 업데이트한다.
// 서버에서 notification 을 어떻게 보내는지 알려면 다음을 참고. (https://rnfirebase.io/messaging/server-integration)

// 기기 상태에 따라 수신된 메시지는 디바이스와 모듈에 따라 다르게 처리되어진다.
// Foreground When the application is open and in view.
// Background When the application is open, however in the background (minimised). This typically occurs when the user has pressed the "home" button on the device or has switched to another app via the app switcher.
// Quit When the device is locked or application is not active or running. The user can quit an app by "swiping it away" via the app switcher UI on the device.
// 활성화 된 Foreground 상태, 앱을 이용 중일 때,
// 비 활성화된 Background 상태, 홈버튼 을 누르는 등 상태 (종료된 상태와 다르다. 작업관리자에서 확인 가능한 경우)
// 앱이 종료된 상태 Quit 로 나누어 생각할 수 있다.
// 사용자는 메시지를 받으려면 반드시 앱을 실행해야한다. 사용자가 device settings 에서 강제로 앱을 종료하면 메시지를 받기 전에 반드시 다시 실행시켜야 한다.
// 메시지의 컨텐츠에 따라, device 가 메시지를 어떻게 다룰지 이해하는 것은 중요하다. (e.g. display a notification, or even ignore it) 그리고 또한
// 어떻게 라이브러리가 your own listeners 에게 이벤트를 보내는지를 이해하는 것도 중요하다.
// Notification onMessage setBackgroundMessageHandler setBackgroundMessageHandler
// Notification + Data onMessage setBackgroundMessageHandler setBackgroundMessageHandler
// Data onMessage setBackgroundMessageHandler (see below) setBackgroundMessageHandler (see below)
// 윗 내용은 쉽게 생각하면 전달하는 메시지 객체에 대해 notification 속성과 data 속성이 있거나 없을 때에 대한 내용이다.
// 위 표를 요약하면 Foreground 상태에서는 이벤트 핸들러의 onMessage를 이용해 핸들링 할 수 있고, Background 와 Quit 는 setBackgroundMessageHandler 를 이용할 수 있다는 것.
// message 가 data-only 이고 device 가 background 나 quit 상태일 때, Android 와 iOS 모두 message 를 low priority 로 다루고 ignore 할 것이다. (i.e. no event will be sent.)
// 하지만 payload 의 프로퍼티에 Android (priority to high), iOS (content-available to true) 해줌으로서 priority 를 높일 수 있다.
// iOS 에서 data-only 이고 background or quit 인 상태에서,
// 메시지는 앱의 javascript 가 로딩되고 실행준비되어서 setBackgroundMessageHandler 가 등록될 때까지 딜레이될 것이다.
// 이 옵션들을 메시지 페이로드에 어떻게 보내는지 알려면 여기를 참고 (https://firebase.google.com/docs/cloud-messaging/concept-options?hl=ko)

// 기기의 상태와 메시지 콘텐츠는 Notification 이 보여질 지를 결정할 수 있다.
//                                     Foreground           Background          Quit
// Notification                Notification: ❌    Notification: ✅     Notification: ✅
// Notification + Data    Notification: ❌    Notification: ✅     Notification: ✅
// Data                            Notification: ❌     Notification: ❌     Notification: ❌

import React, { useEffect } from 'react';
import { Alert } from 'react-native';
import messaging from '@react-native-firebase/messaging';

function App() {
  useEffect(() => {
    const unsubscribe = messaging().onMessage(async remoteMessage => {
      Alert.alert('A new FCM message arrived!', JSON.stringify(remoteMessage));
    });

    return unsubscribe;
  }, []);
}
 
// onMessage handler 의 케이스에서 RemoteMessage payload 가 notification 속성을 가지고 있다면, 기기는 어떤 notification 도 사용자에게 보여주지 않을 것이다.
// 대신에, local notification 이나 in-app UI 를 업데이트해 줄 수 있다.
// local notification (Displaying & handling notifications from FCM.) https://rnfirebase.io/messaging/notifications#notifee---advanced-notifications

// Background & Quit state messages
// background or quite 상태에서는 메시지를 받았을 때 onMessage 핸들러는 실행되지 않는다.
// 대신에, setBackgroundMessageHandler 를 통해서 백그라운드 콜백 핸들러를 등록할 수 있다.
// To setup a background handler, call the setBackgroundMessageHandler outside of your application logic as early as possible:
 
// index.js
import { AppRegistry } from 'react-native';
import messaging from '@react-native-firebase/messaging';
import App from './App';

// Register background handler
messaging().setBackgroundMessageHandler(async remoteMessage => {
  console.log('Message handled in the background!', remoteMessage);
});

AppRegistry.registerComponent('app', () => App);
 
// 핸들러는 기기의 리소스가 free up 되는 logic 이 완료되면 promise 를 리턴해야 한다.
// 이것은 어떤 UI 도 업데이트 하려고 해서는 안된다. (e.g. via state) 하지만 network request 나 local storage update 과 같은 것은 수행할 수 있다.
// remoteMessage property 는 data 와 같이 어떤 커스텀 데이터를 포함해서 FCM 으로부터 기기로 전송된 메시지에 관한 모든 정보를 담고 있다.
// remoteMessage 가 notification 속성을 포함하고 있다면 setBackgroundMessageHandler 로 등록한 핸들러로 보내어졌을 때, 기기는 notification 을 사용자에게 보여준다.

// Data-only messages
// 메시지가 data-only (no notification option) 일 때, Android & iOS 모두 이것을 low priority 로 다룬다. 이는 앱이 깨어나지 않도록 한다. (ignoring the message)
// data-only 메시지가 background handler 를 trigger 하도록 하려면, Android 에서는 priority 를 high 로 iOS 에서는 content-available 을 enable 로 해주어야 한다.
 
admin.messaging().sendToDevice(
  [], // device fcm tokens...
  {
    data: {
      owner: JSON.stringify(owner),
      user: JSON.stringify(user),
      picture: JSON.stringify(picture),
    },
  },
  {
    // Required for background/quit data-only messages on iOS
    contentAvailable: true,
    // Required for background/quit data-only messages on Android
    priority: 'high',
  },
);
 
// iOS 의 data-only 메시지의 경우, 메시지는 content-available 로 background handler 를 트리거할 수 있게 하는 속성 뿐 아니라
 
admin.messaging().send({
  data: {
    //some data
  },
  apns: {
    payload: {
      aps: {
        contentAvailable: true,
      },
    },
    headers: {
      'apns-push-type': 'background',
      'apns-priority': '5',
      'apns-topic': '', // your app bundle identifier
    },
  },
  //must include token, topic, or condition
  //token: //device token
  //topic: //notification topic
  //condition: //notification condition
});

// Background Application State
// backgroud/quit 상태의 메시지를 Android 와 iOS 모두에서 지원하지만, 이것이 어떻게 작동되는지에 대한 내부적인 구현은 Android와 iOS에서 서로 다르다
// 안드로이드는 Headless JS (https://reactnative.dev/docs/headless-js-android) 가 생성되고 main React Component 와 따로 분리되어 실행된다.
// root Component 를 mounting 할 필요없이 background handler code 를 실행하도록 해준다.
// 하지만 iOS 에서는, 메시지를 받으면 기기는 silently 하게 백그라운드 상태에서 앱을 실행시킨다. 여기서 등록된 백그라운드 핸들러 (via setBackgroundMessageHandler) 가 trigger 된다.
// 하지만 root React component 또한 mounted 된다. 이건 어떤 경우에는 문제가 될 수 있다. 앱에 있는 어떤 side effect 들이 수행될 수 있을 수도 있다. (e.g. useEffects, analytics events/trigger etc)
// 이 문제를 풀려면, AppDelegate.m 에 isHeadless 속성을 root component 에 넣는 식으로 할 수 있다. isHeadless 속성을 백그라운드에서 앱이 실행될 경우 null 을 렌더링하도록 사용하면 된다.
 
// index.js
import { AppRegistry } from 'react-native';
import messaging from '@react-native-firebase/messaging';

// Handle background messages using setBackgroundMessageHandler
messaging().setBackgroundMessageHandler(async remoteMessage => {
  console.log('Message handled in the background!', remoteMessage);
});

// Check if app was launched in the background and conditionally render null if so
function HeadlessCheck({ isHeadless }) {
  if (isHeadless) {
    // App has been launched in the background by iOS, ignore
    return null;
  }

  // Render the app component on foreground launch
  return <App />;
}

// Your main application component defined here
function App() {
  // Your application
}

AppRegistry.registerComponent('app', () => HeadlessCheck);
 
// isHeadless 속성을 앱에 추가하려면 AppDelegate.m 파일을 다음과 같이 수정하면 된다.
// add this import statement at the top of your `AppDelegate.m` file
 
// add this import statement at the top of your `AppDelegate.m` file
#import "RNFBMessagingModule.h"

// in "(BOOL)application:(UIApplication *)application didFinishLaunchingWithOptions:(NSDictionary *)launchOptions" method
// Use `addCustomPropsToUserProps` to pass in props for initialization of your app
// Or pass in `nil` if you have none as per below example
// For `withLaunchOptions` please pass in `launchOptions` object
// and use it to set `self.initialProps` (available with react-native >= 0.71.1, older versions need a more difficult style, upgrading is recommended)

self.initialProps = [RNFBMessagingModule addCustomPropsToUserProps:nil withLaunchOptions:launchOptions];
 
// 만약 react-native-navigation 을 사용한다면 getIsHeadless 메소드를 사용할 수 있다. messaging().getIsHeadless().then(isHeadless => {})
// 안드로이드에는 isHeadless 속성은 존재하지 않는다.

// iOS Background Limitation
// iOS 기기에서는 사용자가 Background App Refresh 를 기기 셋팅에서 토글할 수 있다. 더군다나, Background App Refresh 셋팅은 기기가 low power mode 일 때 자동으로 꺼질 것이다.
// iOS Background App Refresh mode 가 off 이면, setBackgroundMessageHandler 로 등록한 handler 가 트리거 되지 않을 것이다.


// Auto Registration (iOS)
// Auto initialization
// Background handler timeout (Android)
// Notification Channel ID
// Notification Color

// Notification 은 사용자 경험을 향상사키고 사용자와 조우하고 하는데 사용되는 중요한 도구이다. Cloud Messaging module 도 기본적인 displaying and handling notifications 를 지원한다.
// FCM 과 함께 좀 더 고급 local notification 을 구현하려면 https://notifee.app/ 를 참고하라.
// Firebase Cloud Messaging SDKs for Android and iOS 는 notifications 가 앱이 background/quit 상태일 때 displayed 될 수 있도록 해주기도 한다.
// Firebase Console, Firebase Admin SDKs and REST API 는 모두 message 에 notification 속성을 가졌다면 이를 허용한다.
// notification 속성이 수신받은 message 에 있다면, 그리고 앱이 background/quit 상태라면, notification 은 기기에서 보여진다. 하지만 앱이 foreground 상태라면
// 이벤트는 notification data 를 포함하여 전달은 되지만, notification 이 보여지지는 않는다.
// Via Firebase Console
// Via Admin SDKs
// Via REST
// Handling Interaction
// 사용자가 notification 을 클릭하면, 기본적으로는 앱을 열 것이다. (FCM 을 통한 notification 은 오직 background 일 때만 보여지기 때문에, 앱은 항상 열릴 것이다.)
// 많은 경우에 있어, 이는 notification 을 클릭해서 열렸는지의 여부를 감지하는데 유용할 것이다. (그래서 특정 스크린을 연다거나 하는 등)
// Interaction 을 다루는 두개의 API 를 제공한다.
// getInitialNotification: When the application is opened from a quit state.
// onNotificationOpenedApp: When the application is running, but in the background.
// 두가지 시나리오를 다루기위해서, 코드는 셋업하는 동안 실행되어질 수 있다. 예를 들어, React Navigation 을 사용한다면
// 앱이 quit 상태에서 열렸을 때 initial route 를 셋팅할 수 있다. 그리고 앱이 background 상태에서 열렸을 때 새로운 스크린을 push 할 수 있다.
 
import React, { useState, useEffect } from 'react';
import messaging from '@react-native-firebase/messaging';
import { NavigationContainer, useNavigation } from '@react-navigation/native';
import { createStackNavigator } from '@react-navigation/stack';

const Stack = createStackNavigator();

function App() {
  const navigation = useNavigation();
  const [loading, setLoading] = useState(true);
  const [initialRoute, setInitialRoute] = useState('Home');

  useEffect(() => {
    // Assume a message-notification contains a "type" property in the data payload of the screen to open

    messaging().onNotificationOpenedApp(remoteMessage => {
      console.log(
        'Notification caused app to open from background state:',
        remoteMessage.notification,
      );
      navigation.navigate(remoteMessage.data.type);
    });

    // Check whether an initial notification is available
    messaging()
      .getInitialNotification()
      .then(remoteMessage => {
        if (remoteMessage) {
          console.log(
            'Notification caused app to open from quit state:',
            remoteMessage.notification,
          );
          setInitialRoute(remoteMessage.data.type); // e.g. "Settings"
        }
        setLoading(false);
      });
  }, []);

  if (loading) {
    return null;
  }

  return (
    <NavigationContainer>
      <Stack.Navigator initialRouteName={initialRoute}>
        <Stack.Screen name="Home" component={HomeScreen} />
        <Stack.Screen name="Settings" component={SettingsScreen} />
      </Stack.Navigator>
    </NavigationContainer>
  );
}
 
// getInitialNotification 호출은 mounting 된 뒤에 React lifecycle 메소드 내에서 일어나야 한다. (e.g. componentDidMount or useEffect)
// 만약에 너무 빨리 호출되면 (e.g. 클래스 생성자나 글로벌 스코프), notification data 는 아마도 사용하지 못할 것이다.
// Android 에서는 에뮬레이터에서 remote notifications 수신을 테스트 할 수 있지만 iOS 에서는 실제 기기가 필요하다.

// Getting Device Token
// 기기로 message 를 보내려면, FCM token 이 필요하다. messaging().getToken() 을 사용해서 가능하다.
// 예제는 Notifee 페이지 (https://notifee.app/react-native/docs/integrations/fcm)에서 볼 수 있다.
 
await messaging().registerDeviceForRemoteMessages();
const token = await messaging().getToken();
// save the token to the db

// Notifee - Android Features
// Advanced channel and group management.
// Custom appearance with HTML text styling, custom icons, badge support, colors and more.
// Behavior management such as custom sounds, vibration patterns, device notification light management and more.
// Displaying on-going Foreground Service Notifications for dealing with long-running background tasks.
// Advanced interaction handling with action buttons, quick reply features and more.
// Support for built in styling; Big Picture Style, Big Text Style, Inbox Style & Messaging Style notifications.
// Adding Progress Indicators & Timers to your notification.

// Notifee - iOS Features
// Advanced Permission management.
// Behavior management such as custom sounds and critical notifications.
// Creating actions & categories.
// To learn more about integrating FCM with Notifee, view the integration documentation.


반응형

댓글

Designed by JB FACTORY